Setting up an Ezviz camera is a straightforward process that ensures efficient home or business surveillance. The Ezviz camera setup begins with unpacking the device and connecting it to a power source. Next, downloading the Ezviz app on a smartphone or tablet facilitates the configuration process. Through the app, users can connect the camera to their Wi-Fi network, enabling remote access to the camera’s feed. Positioning the camera strategically is crucial for optimal coverage, and the app provides guidance on achieving the desired angle. Once installed, users can customize settings such as motion detection and alerts to suit their preferences. Overall, the Ezviz camera setup offers a seamless integration of technology for enhanced security and peace of mind.
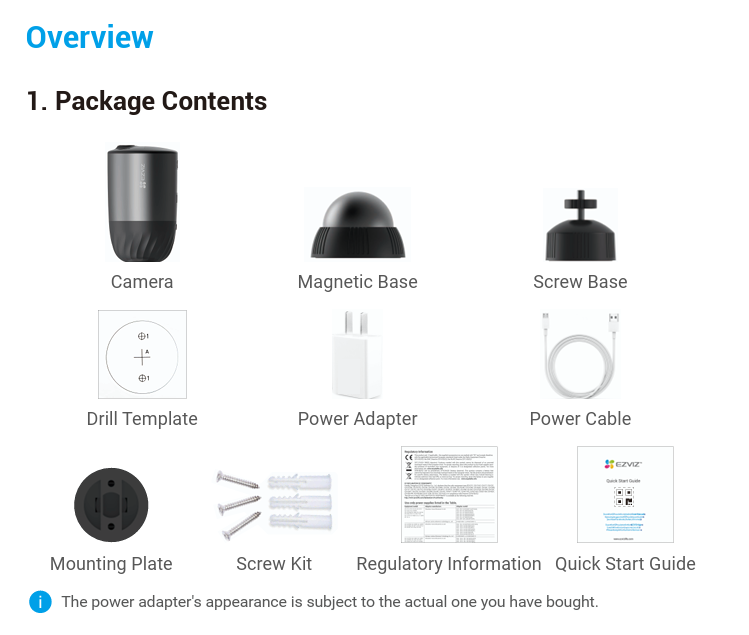
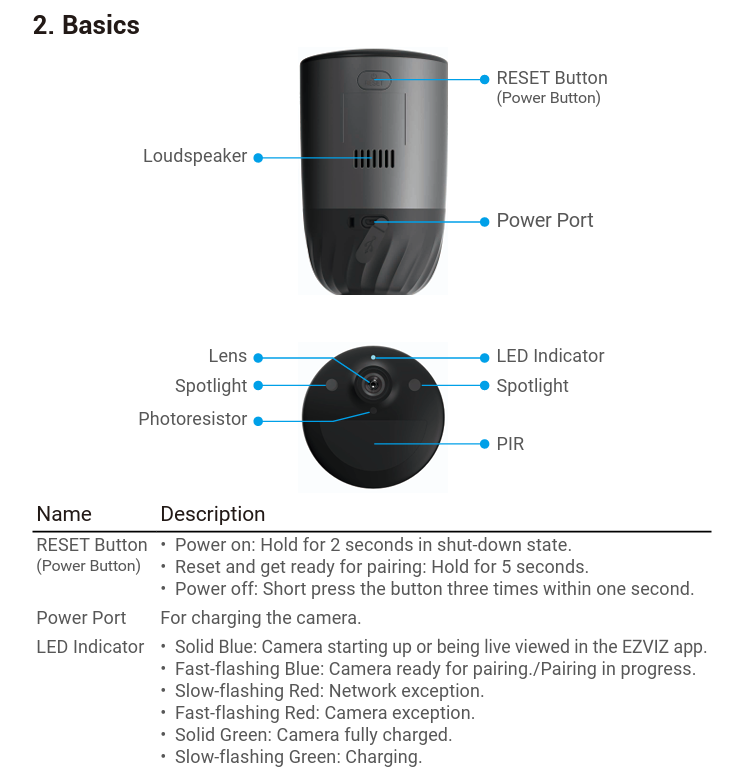
Step
Power-on
In the shutdown state, hold the RESET button for 2 seconds to power on.
If the camera is out of battery, connect it to power outlet with the power adapter
for charging (5V 2A).
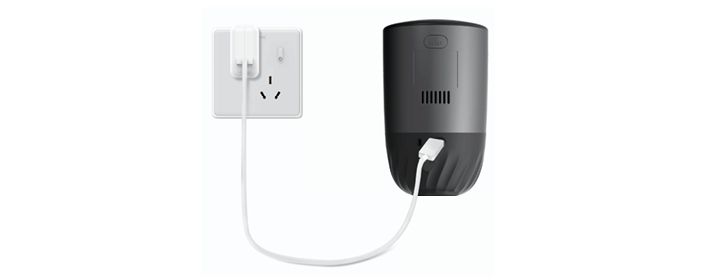
It is recommended to use the power adapter and power cable included in the package.• Remove the camera from the wall before charging.
• Please do not charge the camera when the temperature exceeds 45 degrees or below
0 degrees.
• It is not allowed to charge the camera with power adapter outdoors.
• When charging, the camera will be automatically turned on.
2.Connect to the Internet
- Get the EZVIZ App – Connect your mobile phone to Wi-Fi (suggested). – Download and install the EZVIZ app by searching “EZVIZ” in the App Store or
Google PlayTM.- Launch the app and register an EZVIZ user account.
EZVIZ App
If you have already used the app, please make sure that it is the latest version. To find
out if an update is available, go to the app store and search for EZVIZ. - Add camera to EZVIZ- Press and hold the RESET button on the camera for 5 seconds. The LED
indicator will fast flash blue.- Log in to your account using the EZVIZ app.- On the Home screen, tap “+” on the upper-right corner to go to the Scan QR
Code interface.- Scan the QR code on the Quick Start Guide cover or on the body of the camera.

Follow the EZVIZ app wizard to finish Wi-Fi configuration.
If you want to change your camera’s Wi-Fi, press and hold the reset button for 5s and
repeat the steps above
Installation
1.Installation Location
Choose a location with a clear, unblocked field of view and with a good wireless
signal to the camera. Please keep the following tips in mind:
• Make sure the wall is strong enough to withstand three times the weight of the
camera.
• Camera cannot be installed in front of an air conditioner or facing direct sunlight.
• Recommended installation height: 10 ft (3 m) above the ground.
Recommended installation angle: Tilt down 15 degrees.
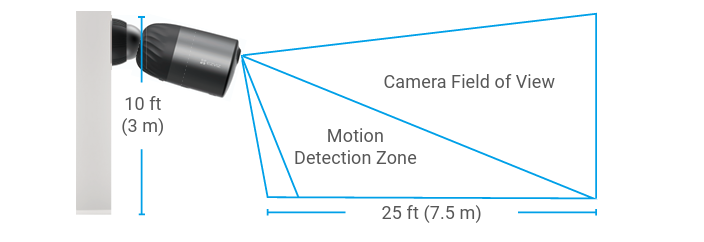
Make sure that side-to-side traffic crosses camera’s field of view. The camera’s motion sensor is much more sensitive to side-to-side movement across its field
of view than to movement directly toward or away from the camera.

2.Installation Steps
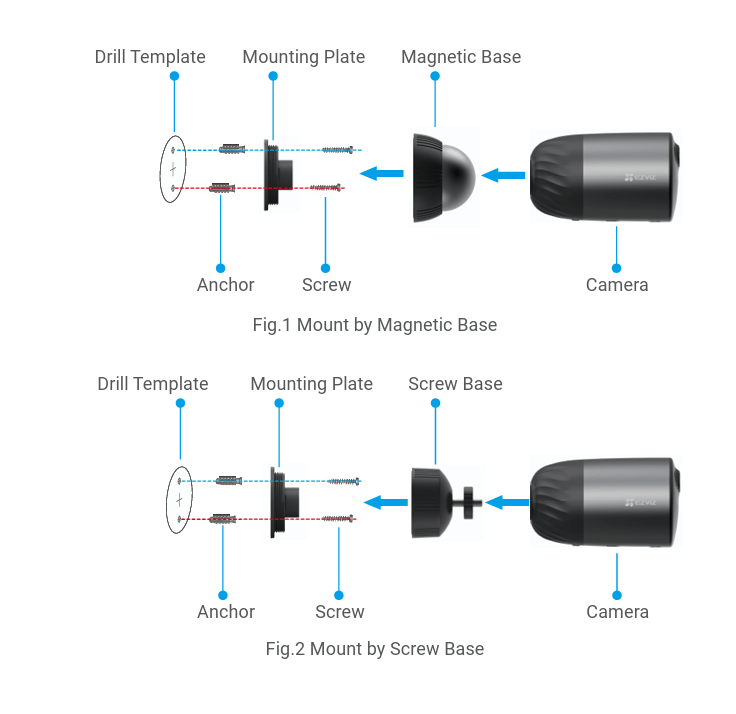
Place drill template onto a clean and flat surface.- (For cement wall only) Drill screw holes according to the template, and insert
anchors.- Use screws to fix the mounting plate according to the template.- Rotate the magnetic base (Fig.1) or screw base (Fig.2) to the mouting plate.- Mount the camera to the base.
View Your Device
The App interface may change due to version update. Please refer to the actual interface.
Live View
When you launch the EZVIZ app, the device page displays as shown below.
You can view and listen to a live feed, take snapshots or recordings, and choose
video definition as needed
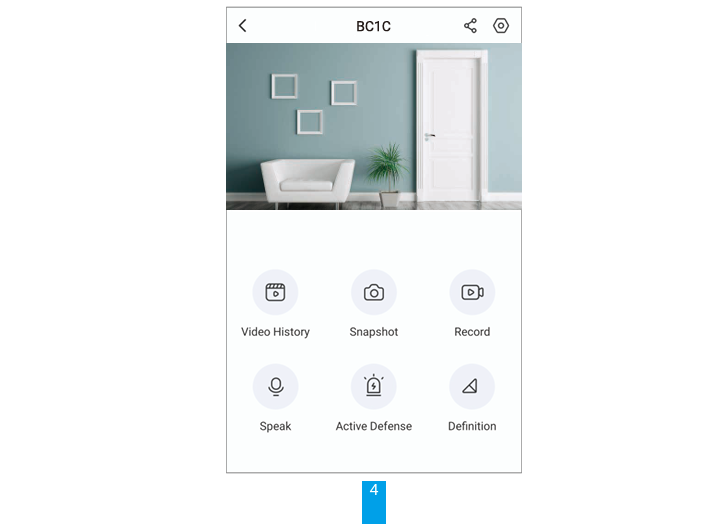
Share. Share your device with anyone you want.
Settings. View or change the device settings.
Video History. View Recordings.
Snapshot. Take a snapshot.
Record. Manually start/stop recording.
Speak. Start using talk and listen.
Active Defense. Sound the alarm to deter intruders.
Definition. Select video resolution from Ultra HD, Hi-Def or
Standard
FAQ
Q: If the camera is offline on the App, will the video recording be continued?
A: If the camera is powered on but disconnect to the Internet, then local
recording will continue but cloud recording will stop. If the camera is powered
off, both video recordings will stop.
Q: Why the alarm is triggered when nobody in the image?
A: Try to set the alarm sensitivity lower. Please notice that vehicle and animals
are also the trigger source.
Q: Does the camera support adding an SD card?
A: The camera has a built-in 32G eMMC memory card, loop recording, and does
not support SD card capacity expansion.
Q: Why is the memory card capacity less than 32G displayed on the App?
A: Due to the calculation difference between binary and decimal arithmetic, the
memory card’s actual capacity is about 90% of the standard capacity

